Django
Django is a Python framework that makes it easier to create web sites using Python.
Django takes care of the difficult stuff so that you can concentrate on building your
web applications.
Django emphasizes reusability of components, also referred to as DRY (Don't Repeat
Yourself), and comes with ready-to-use features like login system, database connection and
CRUD operations (Create Read Update Delete).

Django
Django is especially helpful for database driven websites.
How does Django Work?
Django follows the MVT design pattern (Model View Template).
Model - The data you want to present, usually data from a database.
View - A request handler that returns the relevant template and content - based on the request from the user.
Template - A text file (like an HTML file) containing the layout of the web page, with logic on how to display the data.
Model
The model provides data from the database.
In Django, the data is delivered as an Object Relational Mapping (ORM), which is a technique designed to make it easier to work with databases.
The most common way to extract data from a database is SQL. One problem with SQL is that you have to have a pretty good understanding of the database structure to be able to work with it.
Django, with ORM, makes it easier to communicate with the database, without having to write complex SQL statements.
The models are usually located in a file called models.py.
View
A view is a function or method that takes http requests as arguments, imports the relevant model(s), and finds out what data to send to the template, and returns the final result. The views are usually located in a file called views.py.
Template
A template is a file where you describe how the result should be represented.
Templates are often .html files, with HTML code describing the layout of a web page, but it can also be in other file formats to present other results, but we will concentrate on .html files.
URLs
Django also provides a way to navigate around the different pages in a website.
When a user requests a URL, Django decides which view it will send it to. This is done in a file called urls.py.
-
Create Virtual Environment
Create Virtual Environment
Virtual Environment
It is suggested to have a dedicated virtual environment for each Django project, and one way to manage a virtual environment is venv, which is included in Python.
The name of the virtual environment is your choice, in this tutorial we will call it myworld.
Type the following in the command prompt, remember to navigate to where you want to create your projectvirtualenv env
activate the environment
./env/Scripts/activate - Installation of Django
py -m pip install Django - Check Django Version
django-admin --version - Create Requirements (Create a requirements.txt)
py -m pip freeze > requirements.txt - install requirements.txt
pip install -r requirements.txt - Create django project
django-admin startproject my_project - Go in the project
cd my_project - Run the Django Project
python manage.py runserver - Create Migrate
py manage.py makemigrations - Migrate changes
py manage.py migrate - open a Python shell
py manage.py shell -
Django Create App
Django Create AppWhat is an App? An app is a web application that has a specific meaning in your project, like a home page, a contact form, or a members database. In this tutorial we will create an app that allows us to list and register members in a database. But first, let's just create a simple Django app that displays "Hello World!".
python manage.py startapp app_name -
Django Views
Django ViewsViews
Django views are Python functions that takes http requests and returns http response, like HTML documents.
A web page that uses Django is full of views with different tasks and missions.
Views are usually put in a file called views.py located on your app's folder.
There is a views.py in your app folderviews.py
from django.shortcuts import render from django.http import HttpResponse def members(request): return HttpResponse("Hello world!") - Django URLs
Django URLs
URLs
Create a file named urls.py in the same folder as the views.py file, and type this code in itfrom django.contrib import admin from django.urls import path, include from django.conf import settings from django.conf.urls.static import static urlpatterns = [ path('admin/', admin.site.urls), path('', include('app_name.urls')), ] + static(settings.MEDIA_URL, document_root=settings.MEDIA_ROOT) - View SQL
View SQL
As a side-note: you can view the SQL statement that were executed from the migration above. All you have to do is to run this command, with the migration numberpy manage.py sqlmigrate app_name migrate_number -
Django Models
Django Models
A Django model is a table in your database.
Django Models
Up until now in this tutorial, output has been static data from Python or HTML templates.
Now we will see how Django allows us to work with data, without having to change or upload files in the prosess.
In Django, data is created in objects, called Models, and is actually tables in a database.
Create Table (Model)
To create a model, navigate to the models.py file in the /members/ folder.
Open it, and add a Member table by creating a Member class, and describe the table fields in itfrom django.db import models class Member(models.Model): firstname = models.CharField(max_length=255) lastname = models.CharField(max_length=255) -
run our application by using apache server
apache2.conf
run our application by using apache server
if we want to run our application by using apache server rather than built-in development server, we need to configure apache2.conf file located at /etc/apache directory. Add the following code into this file.
After adding these lines, restart apache server by using the service apache2 restart command and then type localhost to the browser's address bar. This time, project will run on apache server rather than a built-in server. See, it shows the home page of the application.WSGIScriptAlias / /var/www/html/django7/django7/wsgi.py WSGIPythonPath /var/www/html/django7/ <Directory /var/www/html/django7> <Files wsgi.py> Require all granted </Files> </Directory> -
Django MVT
Django MVT
The MVT (Model View Template) is a software design pattern. It is a collection of three important components Model View and Template. The Model helps to handle database. It is a data access layer which handles the data. The Template is a presentation layer which handles User Interface part completely. The View is used to execute the business logic and interact with a model to carry data and renders a template. Although Django follows MVC pattern but maintains it?s own conventions. So, control is handled by the framework itself. There is no separate controller and complete application is based on Model View and Template. That?s why it is called MVT application.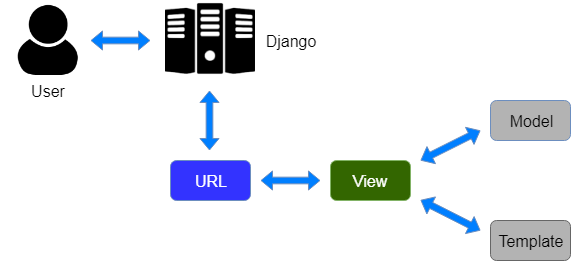 Here, a user requests for a resource to the Django, Django works as a controller and check to
the available resource in URL.
If URL maps, a view is called that interact with model and template, it renders a template.
Django responds back to the user and sends a template as a response.
Here, a user requests for a resource to the Django, Django works as a controller and check to
the available resource in URL.
If URL maps, a view is called that interact with model and template, it renders a template.
Django responds back to the user and sends a template as a response.
-
Django Model Fields
Django Model FieldsThe fields defined inside the Model class are the columns name of the mapped table. The fields name should not be python reserve words like clean, save or delete etc.
Django provides various built-in fields types.Field Name Class Particular AutoField class AutoField(**options) It An IntegerField that automatically increments. BigAutoField class BigAutoField(**options) It is a 64-bit integer, much like an AutoField except that it is guaranteed to fit numbers from 1 to 9223372036854775807. BigIntegerField class BigIntegerField(**options) It is a 64-bit integer, much like an IntegerField except that it is guaranteed to fit numbers from -9223372036854775808 to 9223372036854775807. BinaryField class BinaryField(**options) A field to store raw binary data. BooleanField class BooleanField(**options) A true/false field. The default form widget for this field is a CheckboxInput. CharField class DateField(auto_now=False, auto_now_add=False, **options) It is a date, represented in Python by a datetime.date instance. DateTimeField class DateTimeField(auto_now=False, auto_now_add=False, **options) It is a date, represented in Python by a datetime.date instance. DateTimeField class DateTimeField(auto_now=False, auto_now_add=False, **options) It is used for date and time, represented in Python by a datetime.datetime instance. DecimalField class DecimalField(max_digits=None, decimal_places=None, **options) It is a fixed-precision decimal number, represented in Python by a Decimal instance. DurationField class DurationField(**options) A field for storing periods of time. EmailField class EmailField(max_length=254, **options) It is a CharField that checks that the value is a valid email address. FileField class FileField(upload_to=None, max_length=100, **options) It is a file-upload field. FloatField class FloatField(**options) It is a floating-point number represented in Python by a float instance. ImageField class ImageField(upload_to=None, height_field=None, width_field=None, max_length=100, **options) It inherits all attributes and methods from FileField, but also validates that the uploaded object is a valid image. IntegerField class IntegerField(**options) It is an integer field. Values from -2147483648 to 2147483647 are safe in all databases supported by Django. NullBooleanField class NullBooleanField(**options) Like a BooleanField, but allows NULL as one of the options. PositiveIntegerField class PositiveIntegerField(**options) Like an IntegerField, but must be either positive or zero (0). Values from 0 to 2147483647 are safe in all databases supported by Django. SmallIntegerField class SmallIntegerField(**options) It is like an IntegerField, but only allows values under a certain (database-dependent) point. TextField class TextField(**options) A large text field. The default form widget for this field is a Textarea. TimeField class TimeField(auto_now=False, auto_now_add=False, **options) A time, represented in Python by a datetime.time instance. -
Field Options
Field OptionsEach field requires some arguments that are used to set column attributes. For example, CharField requires mac_length to specify varchar database.
Common arguments available to all field types. All are optionalField Options Particulars Null Django will store empty values as NULL in the database. Blank It is used to allowed field to be blank. Choices An iterable (e.g., a list or tuple) of 2-tuples to use as choices for this field. Default The default value for the field. This can be a value or a callable object. help_text Extra "help" text to be displayed with the form widget. It's useful for documentation even if your field isn't used on a form. primary_key This field is the primary key for the model. Unique This field must be unique throughout the table. - Django Insert Data
Django Insert Data
Add Records The Members table created in the previous chapter is empty. We will use the Python interpreter (Python shell) to add some members to it.py manage.py shellfrom members.models import MemberMember.objects.all()Output:<QuerySet []>
A QuerySet is a collection of data from a database.member = Member(firstname='Emil', lastname='Refsnes')member.save()Member.objects.all().values()member1 = Member(firstname='Tobias', lastname='Refsnes') member2 = Member(firstname='Linus', lastname='Refsnes') member3 = Member(firstname='Lene', lastname='Refsnes') member4 = Member(firstname='Stale', lastname='Refsnes') member5 = Member(firstname='Jane', lastname='Doe') members_list = [member1, member2, member3, member4, member5] for x in members_list: x.save() -
Django Update Data
Django Update Data
Update Records
To update records that are already in the database, we first have to get the record we want to updatefrom members.models import Memberx = Member.objects.all()[4]x will now represent the member at index 4
x.firstname = "Stalikken"x.save() -
Django Delete Data
Django Delete Data
Delete Records
To delete a record in a table, start by getting the record you want to deletefrom members.models import Memberx = Member.objects.all()[4]x will now represent the member at index 4
x.delete() -
Django Update Model
Django Update Model
Add Fields in the Model
To add a field to a table after it is created, open the models.py file, and make your changesfrom django.db import models class Member(models.Model): firstname = models.CharField(max_length=255) lastname = models.CharField(max_length=255) phone = models.IntegerField(null=True) joined_date = models.DateField(null=True) email = models.EmailField(max_length=50) age = models.IntegerField()py manage.py shellfrom members.models import Member x = Member.objects.all()[0] x.phone = 5551234 x.joined_date = '2022-01-05' x.save() -
various built-in error classes in views
various built-in error classes in views
Class Description class HttpResponseNotModified It is used to designate that a page hasn't been modified since the user's last request (status code 304). class HttpResponseBadRequest It acts just like HttpResponse but uses a 400 status code. class HttpResponseNotFound It acts just like HttpResponse but uses a 404 status code. class HttpResponseNotAllowed It acts just like HttpResponse but uses a 410 status code. HttpResponseServerError It acts just like HttpResponse but uses a 500 status code. -
Django Http Decorator
Django Http DecoratorThese decorators are listed in django.views.decorators.http and return a django.http.HttpResponseNotAllowed if the conditions are not met.
from django.shortcuts import render # Create your views here. from django.http import HttpResponse, HttpResponseNotFound from django.views.decorators.http import require_http_methods @require_http_methods(["GET"]) def show(request): return HttpResponse('<h1>This is Http GET request.</h1>') -
Django URL Functions
Django URL Functions
Name Description Example path(route, view, kwargs=None, name=None) It returns an element for inclusion in urlpatterns. path('index/', views.index, name='main-view') re_path(route, view, kwargs=None, name=None) It returns an element for inclusion in urlpatterns. re_path(r'^index/$', views.index, name='index'), include(module, namespace=None) It is a function that takes a full Python import path to another URLconf module that should be "included" in this place. register_converter(converter, type_name) It is used for registering a converter for use in path() routes. -
Django Static Files Handling
1. Include the django.contrib.staticfiles in INSTALLED_APPS.Django Static Files HandlingIn a web application, apart from business logic and data handling, we also need to handle and manage static resources like CSS, JavaScript, images etc.
It is important to manage these resources so that it does not affect our application performance.
Django deals with it very efficiently and provides a convenient manner to use resources.
The django.contrib.staticfiles module helps to manage themINSTALLED_APPS = [ 'django.contrib.staticfiles', ]STATIC_URL = 'static/' STATICFILES_DIRS = [ BASE_DIR / "static", ] STATIC_ROOT = "/static/"{% load static %}urlpatterns = [ path('admin/', admin.site.urls), path('', include('app_name.urls')) ] + static(settings.MEDIA_URL, document_root=settings.MEDIA_ROOT) -
Django - Sending E-mails
Django - Sending E-mailsDjango comes with a ready and easy-to-use light engine to send e-mail. Similar to Python you just need an import of smtplib. In Django you just need to import django.core.mail. To start sending e-mail, edit your project settings.py file and set the following options : EMAIL_HOST − smtp server. EMAIL_HOST_USER − Login credential for the smtp server. EMAIL_HOST_PASSWORD − Password credential for the smtp server. EMAIL_PORT − smtp server port. EMAIL_USE_TLS or _SSL − True if secure connection. Parameters details for the EmailMessage class creation − Subject − E-mail subject. message − E-mail body in HTML. from_email − E-mail from. to − List of receivers’ e-mail address. bcc − List of “Bcc” receivers’ e-mail address. connection − E-mail backend.
from django.core.mail import EmailMessage from django.http import HttpResponse def sendHTMLEmail(request , emailto): html_content = "<strong>Comment tu vas?</strong>" email = EmailMessage("my subject", html_content, "paul@polo.com", [emailto]) email.content_subtype = "html" res = email.send() return HttpResponse('%s'%res) -
Django - Cookies Handling
Django - Cookies Handlingcookies are saved on the client side and depending on your client browser security level, setting cookies can at times work and at times might not. To illustrate cookies handling in Django, let's create a system using the login system we created before. The system will keep you logged in for X minute of time, and beyond that time, you will be out of the app. For this, you will need to set up two cookies, last_connection and username. setting cookie is done by the set_cookie method called on the response not the request, and also note that all cookies values are returned as string.
                                    from django.template import RequestContext

                                    def login(request):
                                       username = "not logged in"

                                       if request.method == "POST":
                                          #Get the posted form
                                          MyLoginForm = LoginForm(request.POST)

                                       if MyLoginForm.is_valid():
                                          username = MyLoginForm.cleaned_data['username']
                                       else:
                                          MyLoginForm = LoginForm()

                                       response = render_to_response(request, 'loggedin.html', {"username" : username},
                                          context_instance = RequestContext(request))

                                       response.set_cookie('last_connection', datetime.datetime.now())
                                       response.set_cookie('username', datetime.datetime.now())

                                       return response
def formView(request): if 'username' in request.COOKIES and 'last_connection' in request.COOKIES: username = request.COOKIES['username'] last_connection = request.COOKIES['last_connection'] last_connection_time = datetime.datetime.strptime(last_connection[:-7], "%Y-%m-%d %H:%M:%S") if (datetime.datetime.now() - last_connection_time).seconds < 10: return render(request, 'loggedin.html', {"username" : username}) else: return render(request, 'login.html', {}) else: return render(request, 'login.html', {})from django.conf.urls import patterns, url from django.views.generic import TemplateView urlpatterns = patterns('myapp.views', url(r'^connection/','formView', name = 'loginform'), url(r'^login/', 'login', name = 'login')) -
Django - Sessions
1) Adding some lines to the MIDDLEWARE_CLASSESDjango - Sessionswe can use client side cookies to store a lot of useful data for the web app. We have seen before that we can use client side cookies to store various data useful for our web app. This leads to lot of security holes depending on the importance of the data you want to save. For security reasons, Django has a session framework for cookies handling. Sessions are used to abstract the receiving and sending of cookies, data is saved on server side (like in database), and the client side cookie just has a session ID for identification. Sessions are also useful to avoid cases where the user browser is set to ‘not accept’ cookies. By default, Django saves session information in database (django_session table or collection), but you can configure the engine to store information using other ways like: in file or in cache. When session is enabled, every request (first argument of any view in Django) has a session (dict) attribute. Some More Possible Actions Using Sessions We have seen how to store and access a session, but it's good to know that the session attribute of the request have some other useful actions like − set_expiry (value) − Sets the expiration time for the session. get_expiry_age() − Returns the number of seconds until this session expires. get_expiry_date() − Returns the date this session will expire. clear_expired() − Removes expired sessions from the session store. get_expire_at_browser_close() − Returns either True or False, depending on whether the user’s session cookies have expired when the user’s web browser is closed.
'django.contrib.sessions.middleware.SessionMiddleware''django.contrib.sessions'def login(request): username = 'not logged in' if request.method == 'POST': MyLoginForm = LoginForm(request.POST) if MyLoginForm.is_valid(): username = MyLoginForm.cleaned_data['username'] request.session['username'] = username else: MyLoginForm = LoginForm() return render(request, 'loggedin.html', {"username" : username})def formView(request): if request.session.has_key('username'): username = request.session['username'] return render(request, 'loggedin.html', {"username" : username}) else: return render(request, 'login.html', {})def logout(request): try: del request.session['username'] except: pass return HttpResponse("You are logged out.") -
Django - Caching
1) Setting Up Cache in DatabaseDjango - CachingDjango comes with its own caching system that lets you save your dynamic pages, to avoid calculating them again when needed. The good point in Django Cache framework is that you can cache 1) The output of a specific view. 2) A part of a template. 3) Your entire site. To use cache in Django, first thing to do is to set up where the cache will stay. The cache framework offers different possibilities - cache can be saved in database, on file system or directly in memory. Setting is done in the settings.py file of your project.
CACHES = { 'default': { 'BACKEND': 'django.core.cache.backends.db.DatabaseCache', 'LOCATION': 'my_table_name', } }python manage.py createcachetableCACHES = { 'default': { 'BACKEND': 'django.core.cache.backends.filebased.FileBasedCache', 'LOCATION': '/var/tmp/django_cache', } }CACHES = { 'default': { 'BACKEND': 'django.core.cache.backends.memcached.MemcachedCache', 'LOCATION': '127.0.0.1:11211', } }MIDDLEWARE_CLASSES += ( 'django.middleware.cache.UpdateCacheMiddleware', 'django.middleware.common.CommonMiddleware', 'django.middleware.cache.FetchFromCacheMiddleware', ) -
Django - Caching
Using Django-dajaxDjango - CachingAjax essentially is a combination of technologies that are integrated together to reduce the number of page loads. We generally use Ajax to ease end-user experience. Using Ajax in Django can be done by directly using an Ajax library like JQuery or others. Let's say you want to use JQuery, then you need to download and serve the library on your server through Apache or others. Then use it in your template, just like you might do while developing any Ajax-based application. Another way of using Ajax in Django is to use the Django Ajax framework. The most commonly used is django-dajax which is a powerful tool to easily and super-quickly develop asynchronous presentation logic in web applications, using Python and almost no JavaScript source code. It supports four of the most popular Ajax frameworks: Prototype, jQuery, Dojo and MooTools.
pip install django_dajaxINSTALLED_APPS += ( 'dajaxice', 'dajax' )TEMPLATE_LOADERS = ( 'django.template.loaders.filesystem.Loader', 'django.template.loaders.app_directories.Loader', 'django.template.loaders.eggs.Loader', ) TEMPLATE_CONTEXT_PROCESSORS = ( 'django.contrib.auth.context_processors.auth', 'django.core.context_processors.debug', 'django.core.context_processors.i18n', 'django.core.context_processors.media', 'django.core.context_processors.static', 'django.core.context_processors.request', 'django.contrib.messages.context_processors.messages' ) STATICFILES_FINDERS = ( 'django.contrib.staticfiles.finders.FileSystemFinder', 'django.contrib.staticfiles.finders.AppDirectoriesFinder', 'dajaxice.finders.DajaxiceFinder', ) DAJAXICE_MEDIA_PREFIX = 'dajaxice'from dajaxice.core import dajaxice_autodiscover, dajaxice_config from django.contrib.staticfiles.urls import staticfiles_urlpatterns from django.conf import settings Then dajax urls: urlpatterns += patterns('', url(r'^%s/' % settings.DAJAXICE_MEDIA_PREFIX, include('dajaxice.urls')),) urlpatterns += staticfiles_urlpatterns()class DreamrealForm(forms.Form): website = forms.CharField(max_length = 100) name = forms.CharField(max_length = 100) phonenumber = forms.CharField(max_length = 50) email = forms.CharField(max_length = 100)from dajaxice.utils import deserialize_form from myapp.form import DreamrealForm from dajax.core import Dajax from myapp.models import Dreamreal @dajaxice_register def send_form(request, form): dajax = Dajax() form = DreamrealForm(deserialize_form(form)) if form.is_valid(): dajax.remove_css_class('#my_form input', 'error') dr = Dreamreal() dr.website = form.cleaned_data.get('website') dr.name = form.cleaned_data.get('name') dr.phonenumber = form.cleaned_data.get('phonenumber') dr.save() dajax.alert("Dreamreal Entry %s was successfully saved." % form.cleaned_data.get('name')) else: dajax.remove_css_class('#my_form input', 'error') for error in form.errors: dajax.add_css_class('#id_%s' % error, 'error') return dajax.json()<html> <head></head> <body> <form action = "" method = "post" id = "my_form" accept-charset = "utf-8"> {{ form.as_p }} <p><input type = "button" value = "Send" onclick = "send_form();"></p> </form> </body> </html>def dreamreal(request): form = DreamrealForm() return render(request, 'dreamreal.html', locals()){% load static %} {% load dajaxice_templatetags %}<script src = "{% static '/static/jquery-1.11.3.min.js' %}" type = "text/javascript" charset = "utf-8"></script> <script src = "{% static '/static/dajax/jquery.dajax.core.js' %}"></script> <script> function send_form(){ Dajaxice.myapp.send_form(Dajax.process,{'form':$('#my_form').serialize(true)}); } </script>python manage.py collectstatic -
Django Prepare Template
Django Prepare Template
Create Template
After creating Models, with the fields and data we want in them, it is time to display the data in a web page.
Start by creating an HTML file named all_members.html and place it in the /templates/ folder
{% for x in mymembers %}- {{ x.firstname }} {{ x.lastname }}
{% endfor %} -
Add Master Template
Add Master Template
The extends Tag
In the previous pages we created two templates, one for listing all members, and one for details about a member.
The templates have a set of HTML code that are the same for both templates.
Django provides a way of making a "parent template" that you can include in all pages to for the stuff that are the same in all pages.
Start by creating a template called master.html, with all the necessary HTML elements<!DOCTYPE html> <html lang="en"> <head> <meta charset="UTF-8"> <meta http-equiv="X-UA-Compatible" content="IE=edge"> <meta name="viewport" content="width=device-width, initial-scale=1.0"> <head> <title>{% block title %}{% endblock %}</title> {% block css %}{% endblock %} </head> <body> {% block content %}{% endblock %} {% block js %}{% endblock %} </body> </html>- Django 404 (page not found)
Django 404 (page not found)
Page Not Found
If you try to access a page that does not exist (a 404 error), Django directs you to a built-in view that handles 404 errors.
If you got the first result, you got directed to the built-in Django 404 template.
If you got the second result, then DEBUG is set to True in your settings, and you must set it to False to get directed to the 404 template.
This is done in the settings.py file, which is located in the project folder, in our case the my_tennis_club folder, where you also have to specify the host name from where your project runs from
Important: When DEBUG = False, Django requires you to specify the hosts you will allow this Django project to run from.
In production, this should be replaced with a proper domain name:
ALLOWED_HOSTS = ['yourdomain.com']
Customize the 404 Template
Django will look for a file named 404.html in the templates folder, and display it when there is a 404 error.
If no such file exists, Django shows the "Not Found" that you saw in the example above.
To customize this message, all you have to do is to create a file in the templates folder and name it 404.html, and fill it with write whatever you want- Add Test View
Add Test View
Test View
When testing different aspects of Django, it can be a good idea to have somewhere to test code without destroying the main project.
This is optional off course, but if you like to follow all steps in this tutorial, you should add a test view that is excactly like the one we create below. Then you can follow the examples and try them out on your own computer.
Add View
Start by adding a view called "testing" in the views.py file- Django Admin
Django Admin
Django Admin
Django Admin is a really great tool in Django, it is actually a CRUD* user interface of all your models!
*CRUD stands for Create Read Update Delete.- Admin - Create User
Admin - Create User
Create User
To be able to log into the admin application, we need to create a user.
This is done by typing this command in the command viewpy manage.py createsuperuser- Admin - Include Member
Admin - Include Member
Include Member in the Admin Interface
To include the Member model in the admin interface, we have to tell Django that this model should be visible in the admin interface.
This is done in a file called admin.py, and is located in your app's folder, which in our case is the members folder.from django.contrib import adminadmin.site.register(Member)- Admin - Set Fields to Display
Admin - Set Fields to Display
Make the List Display More Reader-Friendly
When you display a Model as a list, Django displays each record as the string representation of the record object, which in our case is "Member object (1)", "Member object(2)" etc.
We can control the fields to display by specifying them in in a list_display property in the admin.py file.
First create a MemberAdmin() class and specify the list_display tuple, like thismodels.py
def __str__(self): return f"{self.firstname} {self.lastname}"admin.py
class MemberAdmin(admin.ModelAdmin): list_display = ("firstname", "lastname", "joined_date",) admin.site.register(Member, MemberAdmin)- Django Template Variables
Django Template Variables
Template Variables
In Django templates, you can render variables by putting them inside {{ }} brackets
<h1>Hello {{ firstname }}, how are you?</h1>context = { 'firstname': 'Linus', }You can also create variables directly in the template, by using the {% with %} template tag
{% with firstname="Tobias" %} <h1>Hello {{ firstname }}, how are you?</h1>from .models import Membermymembers = Member.objects.all().values() context = { 'mymembers': mymembers, }
We use the Django template tag {% for %} to loop through the members.
{% for x in mymembers %} <li>{{ x.firstname }}</li> {% endfor %}- Django Template Tags
Django Template Tags
Template Tags
In Django templates, you can perform programming logic like executing if statements and for loops.
These keywords, if and for, are called "template tags" in Django.
To execute template tags, we surround them in {% %} brackets.
Django Code
The template tags are a way of telling Django that here comes something else than plain HTML.
The template tags allows us to to do some programming on the server before sending HTML to the client. Tag ReferenceTag Description autoescape Specifies if autoescape mode is on or off block Specifies a block section comment Specifies a comment section csrf_token Protects forms from Cross Site Request Forgeries cycle Specifies content to use in each cycle of a loop debug Specifies debugging information extends Specifies a parent template filter Filters content before returning it firstof Returns the first not empty variable for Specifies a for loop if Specifies a if statement ifchanged Used in for loops. Outputs a block only if a value has changed since the last iteration include Specifies included content/template load Loads template tags from another library lorem Outputs random text now Outputs the current date/time regroup Sorts an object by a group resetcycle Used in cycles. Resets the cycle spaceless Removes whitespace between HTML tags templatetag Outputs a specified template tag url Returns the absolute URL part of a URL verbatim Specifies contents that should not be rendered by the template engine widthratio Calculates a width value based on the ratio between a given value and a max value with Specifies a variable to use in the block - Django if Tag
Django if Tag
If Statement An if statement evaluates a variable and executes a block of code if the value is true. Elif The elif keyword says "if the previous conditions were not true, then try this condition". Else The else keyword catches anything which isn't caught by the preceding conditions.{% if greeting == 1 %} {% endif %}{% if greeting == 1 %} {% elif greeting == 2 %} {% endif %}{% if greeting == 1 %} {% elif greeting == 2 %} {% else %} {% endif %}- Operators
{% if greeting == 2 %} {% endif %}{% if greeting == 2 %} {% endif %}{% if greeting ! = 2 %} {% endif %}> Is less than.
<= Is less than, or equal to.
>= Is greater than, or equal to.{% if greeting < 2 %} {% endif %}To check if more than one condition is true.
{% if greeting == 1 and day == "Friday" %} {% endif %}{% if greeting == 2 %} {% endif %}To check if one of the conditions is true.
{% if greeting == 1 or greeting == 5 %} {% endif %}To check if a certain item is present in an object.
{% if 'Banana' in fruits %} {% endif %}To check if a certain item is not present in an object.
{% if 'Banana' not in fruits %} {% endif %}Check if two objects are the same. This operator is different from the == operator, because the == operator checks the values of two objects, but the is operator checks the identity of two objects.
{% if x is y %} {% else %} {% endif %}- Django for Tag
Django for Tag
For Loops
A for loop is used for iterating over a sequence, like looping over items in an array, a list, or a dictionary.
Reversed
The reversed keyword is used when you want to do the loop in reversed order.
Empty
The empty keyword can be used if you want to do something special if the object is empty.{% for x in fruits %}{% endfor %}{% for x in members reversed %} {% endfor %}{% for x in emptytestobject %} {% empty %} {% endfor %}- Loop Variables
Loop Variables
Django has some variables that are available for you inside a loop:
forloop.counter
forloop.counter0
forloop.first
forloop.last
forloop.parentloop
forloop.revcounter
forloop.revcounter0
The current iteration, starting at 1.
{% for x in fruits %} {{ forloop.counter }} {% endfor %}The current iteration, starting at 0.
{% for x in fruits %} {{ forloop.counter0 }} {% endfor %}Allows you to test if the loop is on its first iteration.
{% for x in fruits %} <li {% if forloop.first %} style='background-color:lightblue;' {% endif %} >{{ x }}</li> {% endfor %}Allows you to test if the loop is on its last iteration.
{% for x in fruits %} <li {% if forloop.last %} style='background-color:lightblue;' {% endif %} >{{ x }}</li> {% endfor %}The current iteration if you start at the end and count backwards, ending up at 1.
{% for x in fruits %} {{ forloop.revcounter }} {% endfor %}The current iteration if you start at the end and count backwards, ending up at 0.
{% for x in fruits %} {{ forloop.revcounter0 }} {% endfor %}- Django comment Tag
Django comment Tag
Comments
Comments allows you to have sections of code that should be ignored.
Comment Description
You can add a message to your comment, to help you remember why you wrote the comment, or as message to other people reading the code.{% comment %} {% endcomment %}
                                            {% comment "this was the original welcome message" %}

{% endcomment %}
<h1>Welcome{# Everyone#}</h1>- Django include Tag
Django include Tag
Include
The include tag allows you to include a template inside the current template.
This is useful when you have a block of content that is the same for many pages.
Variables in Include
You can send variables into the template by using the with keyword.
In the include file, you refer to the variables by using the {{ variablename }} syntax{% include 'footer.html' %}
Variables in Include
{% include "mymenu.html" with me="TOBIAS" sponsor="W3SCHOOLS" %}
mymenu.html
<div>HOME | {{ me }} | ABOUT | FORUM | {{ sponsor }}</div>- Django QuerySet
Django QuerySet
Django QuerySet
A QuerySet is a collection of data from a database.
A QuerySet is built up as a list of objects.
QuerySets makes it easier to get the data you actually need, by allowing you to filter and order the data at an early stage.- QuerySet - Get Data
QuerySet - Get Data
Get Data There are different methods to get data from a model into a QuerySet. The values() Method The values() method allows you to return each object as a Python dictionary, with the names and values as key/value pairs Return Specific Columns The values_list() method allows you to return only the columns that you specify.- Django QuerySet - Filter
Django QuerySet - Filter
QuerySet Filter
The filter() method is used to filter your search, and allows you to return only the rows that matches the search term.
AND
The filter() method takes the arguments as **kwargs (keyword arguments), so you can filter on more than one field by sepearting them by a comma.
OR
To return records where firstname is Emil or firstname is Tobias (meaning: returning records that matches either query, not necessarily both) is not as easy as the AND example above.
We can use multiple filter() methods, separated by a pipe | character. The results will merge into one model.
Field Lookups
Django has its own way of specifying SQL statements and WHERE clauses.
To make specific where clasuses in Django, use "Field lookups".
Field lookups are keywords that represents specific SQL keywords.In SQL, the above statement would be written like this:
SELECT * FROM members WHERE firstname = 'Emil';mydata = Member.objects.filter(firstname='Emil').values()In SQL, the above statement would be written like this:
SELECT * FROM members WHERE lastname = 'Refsnes' AND id = 2;mydata = Member.objects.filter(lastname='Refsnes', id=2).values()In SQL, the above statement would be written like this:
SELECT * FROM members WHERE firstname = 'Emil' OR firstname = 'Tobias';mydata = Member.objects.filter(firstname='Emil').values() | Member.objects.filter(firstname='Tobias').values()from django.db.models import Qmydata = Member.objects.filter(Q(firstname='Emil') | Q(firstname='Tobias')).values()Is the same as the SQL statment:
WHERE firstname LIKE 'L%'.filter(firstname__startswith='L');- Field Lookups Reference
Field Lookups Reference
Keyword Description contains Contains the phrase icontains Same as contains, but case-insensitive date Matches a date day Matches a date (day of month, 1-31) (for dates) endswith Ends with iendswith Same as endswidth, but case-insensitive exact An exact match iexact Same as exact, but case-insensitive in Matches one of the values isnull Matches NULL values gt Greater than gte Greater than, or equal to hour Matches an hour (for datetimes) lt Less than lte Less than, or equal to minute Matches a minute (for datetimes) month Matches a month (for dates) quarter Matches a quarter of the year (1-4) (for dates) range Match between regex Matches a regular expression iregex Same as regex, but case-insensitive second Matches a second (for datetimes) startswith Starts with istartswith Same as startswith, but case-insensitive time Matches a time (for datetimes) week Matches a week number (1-53) (for dates) week_day Matches a day of week (1-7) 1 is sunday iso_week_day Matches a ISO 8601 day of week (1-7) 1 is monday year Matches a year (for dates) iso_year Matches an ISO 8601 year (for dates) - QuerySet - Order By
QuerySet - Order By
Order By
To sort QuerySets, Django uses the order_by() method
Descending Order
By default, the result is sorted ascending (the lowest value first), to change the direction to descending (the highest value first), use the minus sign (NOT), - in front of the field name
Multiple Order Bys
To order by more than one field, separate the fieldnames with a comma in the order_by() methodIn SQL, the above statement would be written like this:
SELECT * FROM members ORDER BY firstname;mydata = Member.objects.all().order_by('firstname').values()In SQL, the above statement would be written like this:
SELECT * FROM members ORDER BY firstname DESC;mydata = Member.objects.all().order_by('-firstname').values()In SQL, the above statement would be written like this:
SELECT * FROM members ORDER BY lastname ASC, id DESC;mydata = Member.objects.all().order_by('lastname', '-id').values()- Django QuerySet - Filter
Django QuerySet - Filter
Create Static Folder
When building web applications, you probably want to add some static files like images or css files.
Start by creating a folder named static in your project, the same place where you created the templates folder:
The name of the folder has to be static.
Add a CSS file in the static folder, the name is your choice, we will call it myfirst.css
Didn't Work?
Just testing? If you just want to play around, and not going to deploy your work, you can set DEBUG = True in the settings.py file, and the example above will work.
Plan to deploy? If you plan to deploy your work, you should set DEBUG = False in the settings.py file. The example above will fail, because Django has no built-in solution for serving static files, but there are other ways to serve static files{% load static %}<link rel="stylesheet" href="{% static 'myfirst.css' %}">- Django Installing WhiteNoise
Django Installing WhiteNoise
WhiteNoise
Django does not have a built-in solution for serving static files, at least not in production when DEBUG has to be False.
We have to use a third-party solution to accomplish this.
In this Tutorial we will use WhiteNoise, which is a Python library, built for serving static files.
Modify Settings
To make Django aware of you wanting to run WhitNoise, you have to specify it in the MIDDLEWARE list in settings.py file
Handle Static Files
Static files in your project, like stylesheets, JavaScripts, and images, are not handled automatically by Django when DEBUG = False.
When DEBUG = True, this worked fine, all we had to do was to put them in the static folder of the application.
When DEBUG = False, static files have to be collected and put in a specified folder before we can use it.
Collect Static Files
To collect all necessary static files for your project, start by specifying a STATIC_ROOT property in the settings.py file.
This specifies a folder where you want to collect your static files.
You can call the folder whatever you like, we will call it productionfiles
pip install whitenoiseMIDDLEWARE = [ 'whitenoise.middleware.WhiteNoiseMiddleware', ] STATIC_ROOT = BASE_DIR / 'productionfiles'STATIC_URL = 'static/'py manage.py collectstatic- Django - Global Static Files
Django - Global Static Files
Add a Global File
We have learned how to add a static file in the application's static folder, and how to use it in the application.
But what if other applications in your project wants to use the file?
Then we have to create a folder on the root directory and put the file(s) there.
It is not enough to create a static folder in the root directory, and Django will fix the rest. We have to tell Django where to look for these static files.
Add a CSS file in the mystaticfiles folder, the name is your choice, we will call it myglobal.css
In the STATICFILES_DIRS list, you can list all the directories where Django should look for static files.
The BASE_DIR keyword represents the root directory of the project, and together with the / "mystaticfiles", it means the mystaticfiles folder in the root directory.
Search Order
If you have files with the same name, Django will use the first occurrence of the file.
The search starts in the directories listed in STATICFILES_DIRS, using the order you have provided. Then, if the file is not found, the search continues in the static folder of each application.
Modify the Template
Now you have a global CSS file for the entire project, which can be accessed from all your applications.
To use it in a template, use the same syntax as you did for the myfirst.css file:#Add this in your settings.py file: STATICFILES_DIRS = [ BASE_DIR / 'mystaticfiles' ]{% load static %}<link rel="stylesheet" href="{% static 'myglobal.css' %}">py manage.py collectstatic- Django with PostgreSQL
Django with PostgreSQL
PostgreSQL database is an open source relational database, which should cover most demands you have when creating a database for a Django project.
It has a good reputation, it is reliable, and it perform well under most circumstances.
We will add a PostgreSQL database to our Django project.
To be able to use PostgreSQL in Django we have to install a package called psycopg2.
The psycopg2 package is a driver that is necessary for PostgreSQL to work in Python.
We also need a server where we can host the database.pip install psycopg2-binaryDATABASES = { 'default': { 'ENGINE': 'django.db.backends.postgresql', 'NAME': 'postgres', 'USER': 'masteruser', 'PASSWORD': '12345678', 'HOST': 'w3-django-project.cdxmgq9zqqlr.us-east-1.rds.amazonaws.com', 'PORT': '5432' } } .- Deploy Django - django.config
Deploy Django - django.config
Provider-Specific Settings We have chosen AWS as our hosting provider, and Elastic Beanstalk as a service to deploy the Django project, and it has some specific requirements. .ebextension Folder It requires that you create a folder on the root level of your project called .ebextensions Create django.config File In the .ebextensions folder, create a file called django.configmkdir .ebextensionsoption_settings: aws:elasticbeanstalk:container:python: WSGIPath: my_tennis_club.wsgi:application- Django Template Tags Reference
Django Template Tags Reference
Tag Description autoescape Specifies if autoescape mode is on or off block Specifies a block section comment Specifies a comment section csrf_token Protects forms from Cross Site Request Forgeries cycle Specifies content to use in each cycle of a loop debug Specifies debugging information extends Specifies a parent template filter Filters content before returning it firstof Returns the first not empty variable for Specifies a for loop if Specifies a if statement ifchanged Used in for loops. Outputs a block only if a value has changed since the last iteration include Specifies included content/template load Loads template tags from another library lorem Outputs random text now Outputs the current date/time regroup Sorts an object by a group resetcycle Used in cycles. Resets the cycle spaceless Removes whitespace between HTML tags templatetag Outputs a specified template tag url Returns the absolute URL part of a URL verbatim Specifies contents that should not be rendered by the template engine widthratio Calculates a width value based on the ratio between a given value and a max value with Specifies a variable to use in the block - Filter Reference
Filter Reference
Keyword Description add Adds a specified value. addslashes Adds a slash before any quote characters, to escape strings. capfirst Returns the first letter in uppercase. center Centers the value in the middle of a specified width. cut Removes any specified character or phrases. date Returns dates in the specified format. default Returns a specified value if the value is False. default_if_none Returns a specified value if the value is None. dictsort Sorts a dictionary by the given value. dictsortreversed Sorts a dictionary reversed, by the given value. divisibleby Returns True if the value can be divided by the specified number, otherwise it returns False. escape Escapes HTML code from a string. escapejs Escapes JavaScript code from a string. filesizeformat Returns a number into a file size format. first Returns the first item of an object (for Strings, the first character is returned). floatformat Rounds floating numbers to a specified number of decimals, default one decimal. force_escape Escapes HTML code from a string. get_digit Returns a specific digit of a number. iriencode Convert an IRI into a URL friendly string. join Returns the items of a list into a string. json_script Returns an object into a JSON object surrounded by <script></script> tags. last Returns the last item of an object (for Strings, the last character is returned). length Returns the number of items in an object, or the number of characters in a string. length_is Returns True if the length is the same as the specified number linebreaks Returns the text with <br> instead of line breaks, and <p> instead of more than one line break. linebreaksbr Returns the text with <br> instead of line breaks. linenumbers Returns the text with line numbers for each line. ljust Left aligns the value according to a specified width lower Returns the text in lower case letters. make_list Converts a value into a list object. phone2numeric Converts phone numbers with letters into numeric phone numbers. pluralize Adds a 's' at the end of a value if the specified numeric value is not 1. pprint random Returns a random item of an object rjust Right aligns the value according to a specified width safe Marks that this text is safe and should not be HTML escaped. safeseq Marks each item of an object as safe and the item should not be HTML escaped. slice Returns a specified slice of a text or object. slugify Converts text into one long alphanumeric-lower-case word. stringformat Converts the value into a specified format. striptags Removes HTML tags from a text. time Returns a time in the specified format. timesince Returns the difference between two datetimes. timeuntil Returns the difference between two datetimes. title Upper cases the first character of each word in a text, all other characters are converted to lower case. truncatechars Shortens a string into the specified number of characters. truncatechars_html Shortens a string into the specified number of characters, not considering the length of any HTML tags. truncatewords Shortens a string into the specified number of words. truncatewords_html Shortens a string into the specified number of words, not considering any HTML tags. unordered_list Returns the items of an object as an unordered HTML list. upper Returns the text in upper case letters. urlencode URL encodes a string. urlize Returns any URLs in a string as HTML links. urlizetrunc Returns any URLs in a string as HTML links, but shortens the links into the specified number of characters. wordcount Returns the number of words in a text. wordwrap Wrap words at a specified number of characters. yesno Converts Booleans values into specified values. i18n l10n tz - QuerySet Field Lookups Reference
QuerySet Field Lookups Reference
Keyword Description contains Contains the phrase icontains Same as contains, but case-insensitive date Matches a date day Matches a date (day of month, 1-31) (for dates) endswith Ends with iendswith Same as endswidth, but case-insensitive exact An exact match iexact Same as exact, but case-insensitive in Matches one of the values isnull Matches NULL values gt Greater than gte Greater than, or equal to hour Matches an hour (for datetimes) lt Less than lte Less than, or equal to minute Matches a minute (for datetimes) month Matches a month (for dates) quarter Matches a quarter of the year (1-4) (for dates) range Match between regex Matches a regular expression iregex Same as regex, but case-insensitive second Matches a second (for datetimes) startswith Starts with istartswith Same as startswith, but case-insensitive time Matches a time (for datetimes) week Matches a week number (1-53) (for dates) week_day Matches a day of week (1-7) 1 is sunday iso_week_day Matches a ISO 8601 day of week (1-7) 1 is monday year Matches a year (for dates) iso_year Matches an ISO 8601 year (for dates) - Django 404 (page not found)